Your address will show here +12 34 56 78
Eco Construction

A dream comes true – I am building a small house with my hands out of mud!

A month ago we decided to build a new toolshed in the garden and get rid of the ugly plastic structure there was before and change it for a beautiful cob house.

First of all we had to clear the whole space of course, which meant bundling a lot of small branches and caña and bringing it to a new place and destroy the old tool shed.

We marked where we wanted to have the new shed and in the end it came out bigger than we thought. Therefore it is going to be a shed for three departments: drylands, gardens and eco-construction.

P1080215

The first thing to do for building a cob house is the foundation. The foundation of a building serves the purpose of carrying the weight of the load of the building: the roof, walls, floor and things inside the house. It prevents the building from sinking into the ground, potentially causing cracking of the walls and even a collapse of the house.

We dug a trench around 30 cm wide and 40 cm deep all along the marked line and an extra straight part a few meters away from the circle for drainage. We filled the trench half with gravel and compacted it a little bit by stamping on it a few rounds. After that we laid a pipe with holes in the trench and the exit point away from the building. It is important to have a slight slope towards this point, so that the water gets drained away from the house. After laying the pipe we filled the trench up with gravel and compacted it again.

During two amazing communal activities we collected a lot of big stones from the other side of the river and carried them all the way to the gardens! Thanks to all the wonderful people here!

P1080207

On the gravel we built a small wall, which spans the full width of the trench bedding it really thoroughly into the gravel. It is of course way easier to build a stable wall when you have a lot of flat stones, but in the end we managed quite well to lay three layers of stones. The second and third layer is further stabilised with lime mortar.

After finishing the foundation we started preparing everything for building the cob walls. We dug a 2*1 m pit and laid it out with plastic. This is going to be the mixing area.

For building with cob you always use subsoil, which we got luckily from Guy’s greenhouse project, for which he dug a big hole right next to where the cob house is going to be. Through a simple soil test and previous knowledge we know that our soil here is really high in clay content – perfect for building with cob!

The ingredients for cob are really simple and easily accessible: clay subsoil, straw, sand and water.

First you pour a few buckets of water into the mixing pit. After sieving the soil for stones and possible sharp pottery parts or caña you pour it into the water and start stamping. We added 2 to 3 shovels of sand while stamping. Everything needs to be mixed really well. A simple method for doing so is pulling the plastic every now and then from one side to the other, so you get the dry soil from the bottom to the surface.

P1080227

After having mixed everything thoroughly we started breaking up the straw a little bit and put around the same volume of it on top of the mud and mix it again. To know if your mixture is ready you take a big piece of mud and tear it apart. If you have straw in each of the parts the mix is ready to go, if not you have to add more straw.

Now you can start building the walls. For this you take some of the mix on a flat surface. You further knead it a little bit and compact it into a square piece. This piece is then put onto the stone wall and compressed into its place. You continue with the next, taking care that the individual pieces are pressed together to form one mass.

P1080230

Building with cob is an extremely rewarding and fun process and very physically demanding work. And overall I just find it super exciting to build a small house just with your hands and mud!

P1080237

Stay tuned for the next steps in the process as we continue construction…and if you’d like to join in the build, there’s still time – join us now! Book here.

0

Courses and Events

Nestled deep in the heart of the Andalusian mountains, in the bustling Los Molinos ecovillage we are gifted with a weekend of calm and tranquillity, of looking deep within and also making a profound connection with others and the natural world that surrounds us. On the third weekend in July, this came in the form of the Sunseed meditation retreat, with the theme of ‘being at ease.’

FullSizeRender-26

We began on a Friday evening, in the candlelit sanctuary of the Casa Rosa, with a round of introductions and a simple breathing exercise to start off. The weekend continued with an engaging mix of talks, meditations and mindful walks in nature, gently guided by Siggy’s wealth of practice and experience on the subject.

I found my own meditation practice challenged by the Hindu and Buddhist approaches that we learned, much more rooted in sitting in complete stillness than I’m used to! It’s a mark of great discipline I think to be fully relaxed and rooted in the earth with nothing to guide you but your breath. All the participants, from many walks of life, benefited in some way from this immersion in deep silence and introspection.

meditation retreat

We learned a range of meditation techniques, including Indian mudras (hand positions) to embody different emotions, such as compassion and loving kindness. We also learned the Feldenkrais, Yoga Nidra and Pranayama techniques, all of which focus on deep breathing and connecting with our bodies in a way we rarely do in everyday life.

We talked about using our voices and bodies to release stress and trauma that can build up, and can be painful but is necessary for achieving our goal of ‘being at ease.’ Siggy made the comparison to the way that animals go through an extraordinary amount of trauma but don’t show traumatic symptoms unless they are held in captivity or attacked by humans. They release this trauma alone through their bodies, shaking violently and feeling it completely for as long as they need to, then going back to their normal lives. We find many ways of burying trauma and pain, via a hundred different distractions in the form of substances or processes, but to truly be at ease, it must be physically felt and then released. We did this through a ‘talking and listening’ exercise, listening to a partner describe who they are without stopping for five minutes, and without reacting in any way. This kind of ‘automatic talking’, paired with simply being with ourselves, brought up issues in many of us things we might have buried, to deal with in a safe and embracing environment.

evening meditation

My favourite gifts of this course though, were the evening sessions on Saturday and Sunday. On Saturday we went down to the beautiful stone labyrinth and sat in a circle in the candlelit twilight, and created our own ‘symphony’ of sounds, whatever came to us in the moment. The result was a sometimes amusing, sometimes intriguing combination of sounds. Eventually we trailed off into silence, honoured by the flickering candles and bright moonlight lighting our circle.

On Sunday evening we went up to the roof terrace of the Mirador and stargazed, watching as more and more stars appeared in the darkening dusk. It also became an impromptu cloud spotting, as the bright moonlight lit up the passing clouds that rarely appear this time of year in Los Molinos, and satellite and plane spotting too! It was a treasured chance for the mostly city-bound attendees to connect with our unpolluted night sky.

shooting star watching

We finished with a check-in circle and final meditation on the Monday morning, and finally our goodbyes, met with smiles and tears all round. I’m glad to have had the opportunity to examine and expand my own practice, but mostly to have shared this space so intimately with such wonderful people. I look forward to attending another of Siggy’s retreats in the future!

By EVS volunteer Sophie

If this has piqued your interest, check out details of our next retreats here.

candle light meditation
2

Eco Construction

Jack, our previous eco-construction coordinator, gave us an interesting seminar about soil and its use in eco-construction before he left Sunseed.

The seminar started by introducing us different ways to test the soil and find out what can be added  to it to turn it into a perfect eco-construction material.  The “jar test” aims to reveal the composition of the soil tested. In the top part of the jar, the organic matter will float in the water. Underneath this organic matter, there is first a layer of clay followed by a layer of silt. At the bottom part of the jar will gather the heaviest components, such as gravel or sand.

DSCN4320

The second test called the “sausage test” is aimed to determine the type of loam or clay we work with. We first make sausages out of loam. We then can distinguish the ‘sandy loam’ by the ones falling apart once put on the ground. Bending the clay sausages in semicircles, we can figure out that the ones cracking are made of what we call ‘light clay”.

DSCN4322

We were then given more details about the properties of the different components of the soil. As the clay acts like a binder due to its malleability and plasticity, the sand adds solidity and structure. What we call the “clay soil” contains at least 40% of clay, but the majority of eco-constructions will rather not use a lot of it. The silt doesn’t have the plasticity of the clay, and thus, doesn’t present any interest in eco-construction.

Eco-construction techniques make the most of soil’s properties: more than being a natural local resource with very low carbon footprint, constructions made of earth present great advantages in the climatic control, moisture control and even noise control. As well as being fire resistant, it also has a detoxifying effect as it is breathable and can be safely manipulated without gloves.

Did you know than 17% of the Unesco world heritage was made of earth?  The Great Wall of China and the Alhambra had been built using rammed earth. The Adobe used by Shibam, in Yemen in 1500, or the earth shelters built in Iceland show us that earth constructions are probably the most reliable.

0

Drylands Management, Sustainable Living

By Drylands assistant Margaux

With Spring in full bloom in the valley, the Drylands and Sustainable Living departments have been out walking with volunteers to collect the capers that are starting to grow and preserving them in preparation for summer salads. Have you ever picked capers? The pickled capers we use as seasoning are actually the buds of the plant called “Capparis spinosa”. They need to be picked before they turn into these lovely white flowers. It is preferable to pick the smaller buds which have more flavour.

It’s important to follow some basic guidance if you are planning to pick plants in the wild. First of all, make sure that you are not in a preserved zone.  There must be, at least, 5 plants of the same species in the area you are planning to pick. Then, do not collect more than 20-30% of the plant’s fruits or flowers, so it is still able to reproduce. Another last tip, try not to pick close to roads; you shouldn’t be closer than 50 meters from the nearest road.

“Its huge pink-and-white flowers  bristling with stamens and anthers, and its tough thorny leaves were nourished by roots that burrowed for moisture more than a hundred feet into the parched earth.” – South from Granada, Gerard Brenan

Preserving capers is simple –  to start off with you need just a water and salt mixture to soak them. This water needs to be changed every three or four days, four times. One the soaking process is done, you can preserve the capers in vinegar, and with any other herbs you like. Besides being a tasty addition to salads (or as a pizza topping at our famous pizza parties!) capers are known to be powerful anti-oxidants and to help in circulation of blood – so a perfect complement to our healthy sustainable diet here at Sunseed.

DSCN4582
0

Sustainable Living, Tutorial

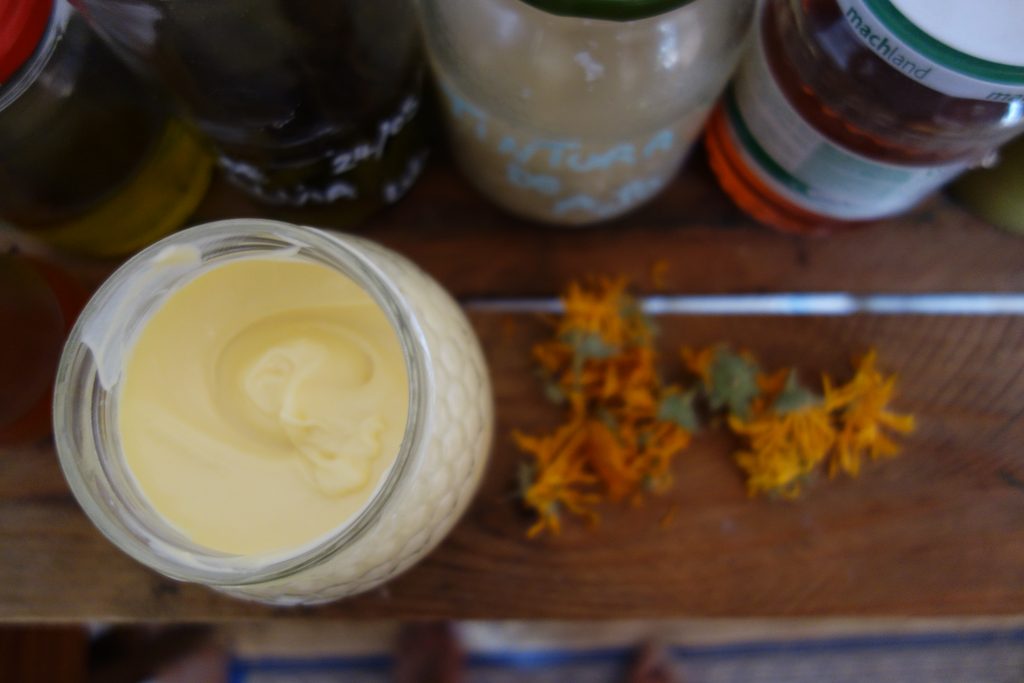
Part of our mission to live sustainably involves working with the natural abundance that’s at our fingertips to create products that are better for us and our environment. Our Sustainable Living department has been using the beautiful calendula in the Sunseed gardens to make a soothing and hydrating natural moisturiser – and you can make your own with just a few products following the steps below.

Jar of natural moisturiser with calendula flowers

Natural Cosmetics – Hydrating Cream (Calendula Base)

To make a cream, you need three main constituents, Oil, Water and an Emulsifier. Once you combine these three in the right quantities and conditions, they form a soft, velvety and hydrating cream.

You can change the thickness and moisture levels of the cream by altering the ratio of oil to water (thicker creams, like a balm, will have much higher emulsifier levels, especially if using beeswax.)

So prepare your ingredients for 100g of cream:

Oil Part (24g in total)

(12g) Almond Oil infused* (see below) with Calendula

(8g) Olive Oil (mild quality, not too strong)

(4g) Emulsifier (i.e Local beeswax or any store bought veg protein, i.e Lanette or Emulsifan)

Water Part (76g in total)

Distilled (or non-chlorinated) water. You can make this a herbal infusion to strengthen the cream, for example with a handful of rose petals, calendula, chamomile, rosemary etc. Be wary that if you add plants to the water part, it will not preserve anywhere near as long.

Preservative Part = Vitamin E (in oil form) or Vitamin C (dehydrated powdered form). If using Beeswax, this acts as a preservative, as it is a natural anti-fungicide.

Essential Oils: (5-10 drops) Any that you feel suit your cream, medicinal purpose, or personal taste. I often use Lavender, given its clean, fresh aroma and anti-bacterial properties.

Natural moisturiser with calendula

Method:

  • Make an infusion for the water part, leave for 4-12 hours to combine. Preferably water is around 60C-80C, not boiling.
  • Mix together all the ingredients for the oil part in a non-metallic bowl (almond, olive oil and emulsifier).
  • In separate pans, heat both the oil and water parts to 60C-65C, once they reach this temperature immediately remove from the heat. (NOTE: I often find using a water-bath technique to slowly heat the mixtures a safer approach).
  • Now they have been removed from the heat, use a blender to whisk the water part. While its whisking, slowly add the heated oil mixture into the water mix.
  • Once evenly mixed, it will form a runny creamy consistency – allow it cool slightly, and then add in your essential oils and Vitamin E/C.
  • While still hot, pour the mixture into your cleaned/sterilised jars (when warm is it much easier to pour).
  • The cream is ready to use once cool and set, which means it will have thickened.
Making natural moisturisers in our herbarium

*Personally, I like to infuse the oils I use with a particular plant, so in this case I chose Calendula for its emollient (skin softening) properties and that it helps sooth burns and mild abrasions/cuts.

*To infuse the oil with a plant, put a handful of the dried herb into a glass jar, fill to the rim with oil and leave for 30-40 days in the sun, turning/softly shake each day. Or for a quicker, but less effective approach, heat the plant (dried or fresh, just use double the amount if fresh) in a saucepan with the chosen oil, bringing it to around 60-65C. Once reached, take of the stove and leave the saucepan covered overnight to infuse. The oil is ready to use the next day (once you’ve filtered the piece of plant out).

Enjoy!

Feel free to get in touch for more information or clarification. To buy the more technical ingredients i.e Lanette, Vitamin E or C and Essential Oils;  I use this website: http://www.cremas-caseras.es/ as we are based in Spain; however there are a number of ecological organisations around to source this from over Europe.

Luke – sustainable.living@sunseed.org.uk

Want to learn more about how to create natural cosmetics? Join us as a volunteer in the Sustainable Living department!

2

Drylands Management

This year in the Drylands Department, we started work on a herb spiral in the Arboretum to demonstrate a water-efficient growing technique for dry areas. First initiated by our volunteer Ulrike, the herb spiral project had then been taken over by Giulia and Margaux – now we’re excited to say that the beautiful project is now finished!

Here in Almeria, the driest region in Europe, building such a spiral can present many benefits.

Efficient water usage

First, the spiral is designed in such a way that it retains the moisture at its base. This design allows a large variety of herbs to grow as it has both a drier zone at the top and a moist area at the bottom.  Our herb spiral will then probably see plants that don’t drink much, like rosemary, oregano and thyme, grow at its top part. The water management of the spiral is such that no water is wasted. The runoff water is collected and absorbed by the thirsty plants positioned at the bottom of the spiral.

Adapted to microclimates

In the same way, the spiral’s design also helps the herbs to benefit from diverse microclimates due to the variety of positions allowed : sunny, sheltered and shady. The top part of the spiral will then be perfect to grow herbs like rosemary, sage and thyme that prefer a sunny position, while the bottom part of the spiral will fit better to shade-loving herbs such as mints.

Heat retention

Besides, the stones used to build the spiral retain heat absorbed during the day, keeping the spiral warm when temperatures drop at night. Retaining the heat can be really useful in a semi-arid climate, where we usually face huge temperature gaps between daytime and night time.

A unique garden feature

More than a practical tool that allows to grow a variety of herbs under the best conditions in a dry area, the herb spiral is also of aesthetic interest. Inspired by nature itself, the design of the spiral ramp is irresistible to the eye and draws it as a focal point in the garden. The stones used for our spiral are carefully chosen to be aesthetically pleasing to our visitors’ eyes.

We’re looking forward to reaping the benefits of our herb spiral in delicious, flavoursome dishes in the months to come!

0

Uncategorized

Programme for Meditation Retreats

June 2016
Finding Deeper Connections:       9th – 11th,        Thurs 5pm – Sat 6pm           €110*
Finding Deeper Connections:       22nd – 24th,     Wed 5pm – Fri 6pm              €110*

July 2016
Being at Ease:                                      15th-18th,         Fri 5pm – Mon 10am            €135*
Being at Ease:                                      27th-30th,        Wed 5pm – Sat 10am            €135*

August 2016
Being at Ease:                                     5th– 8th,            Fri 5pm – Mon 10am            €135*

September 2016
Touching Silence:                              16th-22nd,        Fri 5pm – Thurs 10am         €330*

*Prices are all in and include basic accommodation, all meals provided (delicious, local and vegetarian) and meditation teachings. Three meals per day are provided, as well as dinner on the evening of arrival and breakfast if the retreat finishes in the morning.

About the retreats

This series of meditation retreats will take place at the Sunseed Eco Education centre in the rugged mountains of the South of Spain. They will consist of silent meditation sessions as well as exercises to raise our psycho-emotional awareness. The meditative practices, supported by the rural setting of the retreat and the guidance of the teacher will provide the space needed for inner work, which will enliven our hearts, reawaken our spirits and re-sensitize us to life.

The “Finding Deeper Connections” retreats will focus on how to deepen our connection to others, ourselves and the world around us, thus decreasing our sense of ‘aloneness’ or ‘separateness’.

In the “Being at Ease” retreats we firstly allow inner restlessness and uneasiness with others to rise, in order to courageously move through it and find a greater ease, calm and spaciousness within.

The “Touching Stillness” retreat explores what is in the way of inner calm. Allowing inner conflict, restlessness and tension to surface will support the emergence of the underlying quietness and peacefulness that naturally exists within.

What to expect

The retreat will consist of

  • guided meditation sessions,
  • contemplative walking,
  • raising psycho-emotional awareness through interactive sessions in pairs and groups,
  • talks by the teacher,
  • meditation sessions in nature (cave, mountaintop, rooftop),
  • yoga, relaxation or stretch class.

Just as we can consciously release physical tensions through our awareness of the body and its postures, we can also release emotional tensions simply by recognising them and allowing ourselves to have the problem in the first place. As with physical tensions our emotional tensions have greater power over us the more unconscious they are.

About the teacher

Siggy Verelst has been practising meditation and other spiritual disciplines from a very young age. Having been committed to her inner work and development since her early years, she has immersed herself in meditative practices from various traditions throughout her life.

Motivated by a strong compassion for people and a desire to assist in alleviating suffering through raising one’s awareness Siggy studied psychotherapy for four years and obtained a Masters at the Cairnmillar Institute of Psychology and Psychotherapy in Melbourne, Australia in 2013. She has since been practising as a psychotherapist and holds her own private practice when not teaching abroad. She has also investigated the mind-body connection which she studied in India, Australia and at the Esalen Institute in California. She is also a hypnotherapist and Yoga Nidra teacher.

Siggy’s work has been influenced by teachers like Krishnamurti, Nisargadatta Maharaj, Carl Rogers and Peter Levine. Because of her interest in both psychotherapeutic theories as well as eastern philosophy, her retreats have a strong psychological focus aimed at increasing our emotional understanding of ourselves and improving emotional wellbeing.

For more information on Siggy visit www.amindfulpractice.com

Location

Sunseed is an education centre for sustainable living and will provide the structure and spaces for the retreats. With a view to educate on low impact lifestyles, Sunseed focuses on Eco-Construction, Organic Gardening, Drylands management, Appropriate Technology and Sustainable Living.

Sunseed is located in a small village, Los Molinos del Rio Aguas, in Southern Andalucia, Spain. Abandoned during the rural exodus of the 1950s and 60s, Los Molinos has experienced a vibrant resurgence since the 1980s and is the hub of numerous ecological and progressive organisations including Sunseed Desert Technology, Cultura de la Tierra and Pita Escuela.

The stunning arid landscape that sourounds Los Molinos and its location in a lush oasis in the middle of the desert provide the opportunity for quiet contemplation and observation of nature.

You could make the most of your trip by combining it with some time off to explore the area and visit the nature reserve Cabo de Gata, the beaches along the Costa del Sol or drive up to the mountain range of Las Alpujarras or the Sierra Nevada.

The closest airports are Almeria (1 hour) and Murcia (1,5 hours) and Granada (2 hours).


Prices

Finding Deeper Connections Retreat:       2 days, 2 nights                    €110
Being at Ease Retreat:                                     2 days, 3 nights                    €135
Touching Stillness:                                             5 days, 6 nights                     €330

Prices include basic accommodation, all meals provided (delicious, local and vegetarian) and the meditation teachings.

Accomodation

Sleeping facilities will be in dormitories, with access to toilets, showers and electricity.

What to bring

  • ecological body care products
  • flashlight/torch
  • comfortable shoes
  • a swimming suit for the natural pool
  • earplugs

How to get to Sunseed

Click here.

For questions or more information

Email iloveretreats@gmail.com

To participate:

Step 1: Fill out the registration form by clicking here.

Step 2: Receive a confirmation email with payment details and practical information.

Step 3: Come and have a wonderful retreat in Spain!

thumb_IMG_7005_1024
thumb_IMG_7024_1024
0

Sunseed News
Olive plantation with reservoir
An intensive olive plantation in the region

By EVS Volunteer Margaux:

Our village has now been facing water supply issues for a couple of years, due to the over-exploitation of the aquifer by the olive industry. The precious water from the Río Aguas is being drained in order to water 3000 hectares of intensive olive tree plantations and now a whole and unique ecosystem in the only semi-desert region of Europe is threatened. The main immediate consequence is that we will probably soon get short of water – the villages of Los Perales and La Herreria are already struggling. But even worse than the lack of water alone, it’s that a whole ecosystem is threatened.

The concept of ‘ecocide’ refers to the destruction of ecosystems of a given territory. After a first attempt by a group of concerned locals to bring the case to the local authorities, the next move was to try to get more attention from the international level. A lawsuit was both sent to the UN and the European Union. After many attempts to bring the case to the court, we have finally received a positive answer from the European Union which has agreed to look into the case. The E.U parliament has requested the E.U Commission to conduct a preliminary investigation, which will now need to start to collect further information about the ecocide in order to launch the legal proceedings.

EquoenRioAguasconparlamentarioeuropeo

We’ve been involved in several initiatives to help raise the profile of this urgent issue, including an exhibition and film showing in Almeria, and welcoming EU political representatives to the Rio Aguas to demonstrate the scale of the crisis.

In the meantime, local authorities have come up with a proposal to provide desalinated water to compensate for the lack of water. Nevertheless, this solution will never bring back the precious, fragile ecosystem of the Rio de Aguas.

Don’t hesitate to support us by signing the online petition!

1

Appropriate Technology, Courses and Events

El último fin de semana de 16-17 de abril hemos llevado a cabo un taller de Tratamiento de Aguas Residuales por Fitodepuración, facilitado entre los coordinadores de Sunseed y el colectivo Paissano, amigos de Sunseed apasionados por temas de tratamiento y potabilización de agua. Hemos invitado a participar tanto a lxs voluntarixs de Sunseed como personas de la zona interesadas en aprender cómo construir un sistema ecológico de tratamiento de aguas residuales casero y de bajo costo. Después de cubrir los gastos básicos de comida y alojamiento el aporte económico ha sido voluntario.

Entre unos 10 participantes del curso emprendimos un proyecto práctico de mejorar la última etapa de nuestro sistema de aguas y embellecer el espacio alrededor del camino a la famosa poza de Los Molinos. ¡Construimos un estanque nuevo!

Pond 1

Los estanques están habitualmente instalados como la última etapa de sistemas de tratamiento de agua con humedales artificiales (reed beds). Sirven tanto para almacenar el agua depurada con fin de aprovecharla para riego, como para crear un hábitat natural de fauna y flora, así aumentando la biodiversidad del entorno. Nuestro estanque consiste de una zona de infiltración con grava (sembrada con plantas depuradoras – macrofitas) y zona profunda dónde en futuro queremos plantar macrofitas flotantes como lentejilla de agua o nenúfares. Cuenta con 1200 litros de almacenamiento y un desagüe instalado para regar una huerta/jardín ejemplo en el futuro. El diseño del jardín se realizará durante el Curso de Diseño en Permacultura en Sunseed (1-15 de mayo 2016).

Etapas de construcción

Digging pond
Pond mud

Primero lo primero, tuvimos que limpiar la zona de construcción, anteriormente ocupada por un estanque fantasma, cual con tiempo se había llenado con barro y ha sido apoderad de la omnipresente caña. Los rizomas de caña habían perforado la capa impermeabilizante de plástico, cual dejó de cumplir su función.  

Limpiando la zona del viejo estanque, mucho barro y rizomas de caña…

Después de cavar dimos la forma al estanque nuevo, a través de un proceso de diseño interactivo entre todxs llegamos al consenso de construir una isleta en medio y así naturalmente dar al estanque una pendiente de bajada alrededor de ella. Compactamos el fondo e instalamos el tubo de desagüe.

Installing overflow tube

Instalación del tubo de desagüe.

Impermeabilizamos el estanque con EPDM, un material resistente y flexible. Alrededor colocamos piedras y construimos un pequeño muro seco de ellas para proteger ante la caída del barro en caso de lluvias fuertes. Al seguir rellenamos la parte poco profunda con grava. Ahora solo falta rellenar el estanque con agua y sembrar plantas.

Guy and Blanca with pond

Pensando en los futuros habitantes de nuestro estanque hemos construido una cuevita, la futura casa de una rana muy feliz.

Pond plants 1
Finished pond

Con finalizar la construcción hemos abierto muchas posibilidades de crecimiento de este proyecto. Varias personas voluntarias de Sunseed van a tener la posibilidad de experimentar con la siembra de plantas, elaboración de un jardín autoregante con agua depurada y las modificaciones estéticas del mismo estanque. Como siempre en Sunseed, un proyecto nunca termina, sino va evolucionando…

Para mas información sobre proyectos y cursos parecidos, puedes contactar con nuestro coordenador de Tecnologías Apropriadas, Piotr: piotr.jankowski@hotmail.com.

0

Appropriate Technology, Courses and Events, Sunseed News

Sunseed’s Appropriate Technology co-coordinator Piotr explains how we built a beautiful pond as part of our eco-friendly wastewater treatment system.

Last weekend of 16-17 April at Sunseed we conducted a workshop on Ecological Wastewater Treatment, facilitated by the coordinators of Sunseed and the Paissano collective – friends of Sunseed and big water treatment and purification enthusiasts. We invited both Sunseed volunteers and people from the Almería province interested in learning how to build a low cost ecological wastewater treatment at home. The financial contribution to the course was voluntary, after assuring the basic costs of food and accommodation.
Among some 10 participants of the course we undertook a practical project to improve the last stage of our wastewater system and beautify the space around the path which leads to the famous pool of Los Molinos. We have built a new pond!

Wastewater treatment pond

Ponds are often installed as the last stage of wastewater treatment systems with constructed wetlands (reed beds). They serve a basic function of storing the treated water in order to reuse it for irrigation, as well as to create a natural habitat for fauna and flora, thus increasing the biodiversity of the environment. Our pond consists of an infiltration area with gravel (planted with water treatment plants – macrophytes) and a deep area where in the near future we would like to plant floating macrophytes. It stores 1200 liters of water and is equipped with an overflow system to irrigate an educational self-irrigating garden in the future. We will leave the garden design to the participants of a Permaculture Design Course held by Sunseed between the 1st and 15th of May.

Construction Stages

First things first, we had to clean the construction area previously occupied by a ghost pond, which with time was filled with mud and has been taken over by the ubiquitous cane plants. The rhizomes of cane had pierced the waterproof layer of plastic, which had thus stopped serving its function.

Digging the wastewater pond
Preparing the wastewater pond

Cleaning the old pond area – a lot of mud and cane rhizomes…

After the digging we interactively and collectively designed the form and shape of the new pond. We decided to construct a division wall which allows to have a natural slope around it. Subsequently the ground was compacted and the overflow tube installed.

Installing overflow tube

Installation of the overflow pipe

We waterproofed the pond with EPDM liner, a very strong and flexible material used widely in this type of application. Around the pond we placed stones and built a small dry wall to protect the pond from mud falling inside during heavy rains. Then we filled the shallow area with gravel. Next comes the exciting part of filling it with water and planting the plants.

Guy and Blanca with pond
Petr and pond

Keeping in mind the future habitants of our pond we have created a small cave, a future house of a very happy frog.

Pond plants 1
Finished pond

With the completion of the construction of the pond we have only opened it up for the future improvements and changes. Many Sunseed volunteers will have the opportunity to experiment with the planting of plants, elaboration of a self-watering garden with purified water and the aesthetic modifications of the pond itself. As always in Sunseed, a project never finishes, it evolves…

For more information on similar future projects and courses, contact Sunseed’s Appropriate Technology co-coordinator Piotr on piotr.jankowski@hotmail.com.

1