Your address will show here +12 34 56 78
Eco Construction, Newsletters

There is big excitement in Sunseed about a brand new space that we will inaugurate for the start of the Permaculture Design Certificate Course on May, 1st. With the collaboration of Jef and Kirsty from Cultura de la Tierra and the fundamental help of many volunteers, there will be a new geodesic dome out there to host many of the indoor activities of the course. The participants will also get the opportunity the re-design the area where the dome is located, the Mediterranean Garden, and to give it a new life.

After the PDC, the new dome will be a core space for Sunseed, as it will host many of our communal activities, workshops and meetings. Don’t miss this opportunity to be present in an historical moment for our project, while attending an inspiring permaculture course in the beautiful oasis of Los Molinos del Río Aguas. There are still a few spaces to participate, book it on the Circle Permaculture page!

0

Courses and Events, Eco Construction

Dates

13th – 26th November 2016

Arrival Sunday 13th 5pm

Departure Saturday 26th 10am

15th – 28th January 2017

Arrival Sunday 15th 5pm

Departure Saturday 28th 10am

About the courses

The “10 days intensive cob building course” is a hands-on practical learning experience with small theoretical sessions. During the course we are going to build a small shed out of cob – from the foundations to the roof.

You will learn how to make a perfect cob mix, how to build with cob, how to build window and door frames, how to build a roof and how to give the walls a nice finishing.

The courses takes place in the Sunseed Education Centre on Sustainable Living within the frame of the Eco-Construction Department. Sunseed has been an education centre since 1986 and is based in Los Molinos del Rio Aguas, a small off-grid village in Andalucia in southern Spain, one hour from Almeria.

During the course you will learn about:

  • the history of cob building;
  • why use cob? Its benefits;
  • testing soil;
  • site and design;
  • the ideal cob mix;
  • building with cob;
  • building foundations;
  • building the roof;
  • inserting doors and windows;
  • natural plastering;
  • making your own tools.

Programme

Day 1 Day 2 Day 3 Day 4 Day 5
Tour of Sunseed Presentation about Cob Trench and foundation Theory and practice Soil test and suitability Tools Mixing Cob Building walls Building walls Door frame Building walls Inserting glass bottles
Day 6 Day 7 Day 8 Day 9 Day 10
Building Walls Inserting Windows Inserting glass bottles Making the roof Making the roof Inserting niches Rendering Inserting niches Rendering Closing up and feedback

About the instructor

Michael Hart is the Eco Construction coordinator in Sunseed and will be the main instructor for the course.

Location

Sunseed is an education centre for sustainable living and will provide the structure and spaces for the retreats. With a view to educate on low impact lifestyles, Sunseed focuses on Eco-Construction, Organic Gardening, Drylands management, Appropriate Technology and Sustainable Living.

Sunseed is located in a small village, Los Molinos del Rio Aguas, in Southern Andalucia, Spain. Abandoned during the rural exodus of the 1950s and 60s, Los Molinos has experienced a vibrant resurgence since the 1980s and is the hub of numerous ecological and progressive organisations including Sunseed Desert Technology, Cultura de la Tierra and Pita Escuela.

The stunning arid landscape that sourounds Los Molinos and its location in a lush oasis in the middle of the desert provide the opportunity for quiet contemplation and observation of nature.

You could make the most of your trip by combining it with some time off to explore the area and visit the nature reserve Cabo de Gata, the beaches along the Costa del Sol or drive up to the mountain range of Las Alpujarras or the Sierra Nevada.

The closest airports are Almeria (1 hour) and Murcia (1,5 hours) and Granada (2 hours).

Prices

10 day cob building 12 days, 13 nights €495

Prices include all materials and instructions, basic accommodation and three meals per day (delicious, local and vegetarian).

Accomodation

Sleeping facilities will be in dormitories, with access to toilets, showers and electricity.

What to bring

  • ecological body care products
  • flashlight/torch
  • comfortable shoes
  • a swimming suit for the natural pool
  • earplugs
  • raingear

How to get to Sunseed

Click here.

For bookings, questions or more information

Email: michaelhart86@hotmail.com

Tel: +34 9511 90263

0

Eco Construction

A dream comes true – I am building a small house with my hands out of mud!

A month ago we decided to build a new toolshed in the garden and get rid of the ugly plastic structure there was before and change it for a beautiful cob house.

First of all we had to clear the whole space of course, which meant bundling a lot of small branches and caña and bringing it to a new place and destroy the old tool shed.

We marked where we wanted to have the new shed and in the end it came out bigger than we thought. Therefore it is going to be a shed for three departments: drylands, gardens and eco-construction.

P1080215

The first thing to do for building a cob house is the foundation. The foundation of a building serves the purpose of carrying the weight of the load of the building: the roof, walls, floor and things inside the house. It prevents the building from sinking into the ground, potentially causing cracking of the walls and even a collapse of the house.

We dug a trench around 30 cm wide and 40 cm deep all along the marked line and an extra straight part a few meters away from the circle for drainage. We filled the trench half with gravel and compacted it a little bit by stamping on it a few rounds. After that we laid a pipe with holes in the trench and the exit point away from the building. It is important to have a slight slope towards this point, so that the water gets drained away from the house. After laying the pipe we filled the trench up with gravel and compacted it again.

During two amazing communal activities we collected a lot of big stones from the other side of the river and carried them all the way to the gardens! Thanks to all the wonderful people here!

P1080207

On the gravel we built a small wall, which spans the full width of the trench bedding it really thoroughly into the gravel. It is of course way easier to build a stable wall when you have a lot of flat stones, but in the end we managed quite well to lay three layers of stones. The second and third layer is further stabilised with lime mortar.

After finishing the foundation we started preparing everything for building the cob walls. We dug a 2*1 m pit and laid it out with plastic. This is going to be the mixing area.

For building with cob you always use subsoil, which we got luckily from Guy’s greenhouse project, for which he dug a big hole right next to where the cob house is going to be. Through a simple soil test and previous knowledge we know that our soil here is really high in clay content – perfect for building with cob!

The ingredients for cob are really simple and easily accessible: clay subsoil, straw, sand and water.

First you pour a few buckets of water into the mixing pit. After sieving the soil for stones and possible sharp pottery parts or caña you pour it into the water and start stamping. We added 2 to 3 shovels of sand while stamping. Everything needs to be mixed really well. A simple method for doing so is pulling the plastic every now and then from one side to the other, so you get the dry soil from the bottom to the surface.

P1080227

After having mixed everything thoroughly we started breaking up the straw a little bit and put around the same volume of it on top of the mud and mix it again. To know if your mixture is ready you take a big piece of mud and tear it apart. If you have straw in each of the parts the mix is ready to go, if not you have to add more straw.

Now you can start building the walls. For this you take some of the mix on a flat surface. You further knead it a little bit and compact it into a square piece. This piece is then put onto the stone wall and compressed into its place. You continue with the next, taking care that the individual pieces are pressed together to form one mass.

P1080230

Building with cob is an extremely rewarding and fun process and very physically demanding work. And overall I just find it super exciting to build a small house just with your hands and mud!

P1080237

Stay tuned for the next steps in the process as we continue construction…and if you’d like to join in the build, there’s still time – join us now! Book here.

0

Eco Construction

Jack, our previous eco-construction coordinator, gave us an interesting seminar about soil and its use in eco-construction before he left Sunseed.

The seminar started by introducing us different ways to test the soil and find out what can be added  to it to turn it into a perfect eco-construction material.  The “jar test” aims to reveal the composition of the soil tested. In the top part of the jar, the organic matter will float in the water. Underneath this organic matter, there is first a layer of clay followed by a layer of silt. At the bottom part of the jar will gather the heaviest components, such as gravel or sand.

DSCN4320

The second test called the “sausage test” is aimed to determine the type of loam or clay we work with. We first make sausages out of loam. We then can distinguish the ‘sandy loam’ by the ones falling apart once put on the ground. Bending the clay sausages in semicircles, we can figure out that the ones cracking are made of what we call ‘light clay”.

DSCN4322

We were then given more details about the properties of the different components of the soil. As the clay acts like a binder due to its malleability and plasticity, the sand adds solidity and structure. What we call the “clay soil” contains at least 40% of clay, but the majority of eco-constructions will rather not use a lot of it. The silt doesn’t have the plasticity of the clay, and thus, doesn’t present any interest in eco-construction.

Eco-construction techniques make the most of soil’s properties: more than being a natural local resource with very low carbon footprint, constructions made of earth present great advantages in the climatic control, moisture control and even noise control. As well as being fire resistant, it also has a detoxifying effect as it is breathable and can be safely manipulated without gloves.

Did you know than 17% of the Unesco world heritage was made of earth?  The Great Wall of China and the Alhambra had been built using rammed earth. The Adobe used by Shibam, in Yemen in 1500, or the earth shelters built in Iceland show us that earth constructions are probably the most reliable.

0

Eco Construction

Last month, Lucy Garay from Mexico, with the help of a guide from home, directed and opened the temazcal in the new wellness area at Sunseed. The traditional Mexican style sauna is used for purification ceremonies, connecting awareness of the mind, body and spirit.

The ancestral ceremony was a place where the warriors came to purify, learn to listen to the body, ground into the earth and practice self-control. The temazcal is a deep medicinal treatment that reaches multiple levels in the body; it touches the spirit, in the sense that it lightens any heavy feeling and cleanses the aura so that thoughts weigh less on the mind.

The conjunction of the four elements in the belly of the mother earth is the essence of the temazcal. The medicine is basically made up together with the songs, the consciousness and the willingness of the people to heal themselves. If you attend the temazcal, and you want to feel the fire energy, it’s because you’re on the path to change, Lucy says, and is the opportunity to get rid of anything you don’t need.

It’s a great medicine for many physical illnesses, for circulatory and respiratory conditions, and for the cleansing of the liver and kidneys.

Below are two songs and a transcript of a ceremony.

Temazcal song 1
Song Temazcal 2
Temazcal song 3

Below are some pictures of the construction of the temazcal.

Temazcal 1
Temazcal 2

It was started with a hole dug in the ground and a base made from pallets. Caña made the main frame of the structure.

Temazcal 3

A flagstone floor was put down and a stove was added with an escape horizontal chimney.

Temazcal 5
Temazcal 7

Plastic tubing was put around the base of the caña supports to prevent damage and rotting.

Temazcal 6

The structure was finally covered with rags to keep the heat in.

Temazcal 8

Lucy leads the opening ceremony.

Temazcal 9
3

Eco Construction
Our long term volunteer, Livia, 18 from the bay area, USA, has been experimenting with natural paint recipes alongside our eco-construction coordinator, Jack  to find the most successful non powdering white paint for the interiors of our traditional Andalucian buildings. 4 different binder types were tested on a gypsum plaster base: flour, casein, lime and linseed oil. Paints were tested for their colouration, coverage and adhesiveness (non powdering or flaking) on a tester wall, and the best mixes will be tested on whole walls when refurbishing rooms. The flour paste mixes were deemed the most successful. The paint adhered well and was a good body for fillers, especially clay, which had a lovely matt finish, colour and did not powder at all. A test is planned with marble dust as well when it is sourced, which should be the perfect filler. We used crushed chalk, which worked well but is time consuming and difficult to grind to a sufficiently fine powder, although this can also be bought in a shop. A linseed oil wash can be added over the flour paint to make it water resistant and cleanable. Caesin was also a good adhesive, especially with Lime, which otherwise would not be compatible with Gypsum. The caesin was extracted from our locally sourced goats milk, which was a very simple process involving the curdling with lemon juice. It can also be bought, but is relatively expensive. Our paints had a yellow tint, which improved with higher proportions of white fillers, and which would not be such a problem if using pigments. Besides the off white colour, there are many vegans on the project, and it seemed a little unfair surrounding them with slightly yogurt smelling paints. Linseed oil works extremely well as a binder with all fillers, although proportions would have to be honed in order to get rid of the yellow tint, overly reminiscent of smoke stained bar walls. Another unwanted effect of the oil is a loss of the breathability of the walls, so it should be used very sparingly. Lime works as both a binder and a filler in one, and has been used both in interior and exterior for thousands of years, but unfortunately is chemically incompatible with gypsum, so needs an adhesive additive. Sunseed has been using a mixture with the jelly extracted from macerated prickly pear leaves instead of water for many years, which works well, although has a tendency to flake after 3 years or so. A little linseed oil would very probably extend its working life. Experiments with natural pigments are also under way. The text in the photos are painted with linseed oil mixed with extracted turmeric pigment, charcoal, the Cochineal insect which lives off the prickly pear, and local purple clay. A highly recommended book for recipes and ideas: http://www.greenbooks.co.uk/using-natural-finishes DSCN8232 Flour paint (makes roughly 1.5 litres) 1 cup flour 5.5 cups cold water 1.5 cup screened filler (clay, marble dust, chalk etc)
  1. Mix flour with 2 cups cold water, whisking to remove lumps.
  2. Bring 1.5 cups water to boil, then add the flour water from Step 1.
  3. Turn heat to low, stirring until thick paste develops. Remove from heat.
  4. Dilute the paste with 2 cups water, a little at a time.
  5. Add filler to diluted flour paste until desired consistency is achieved.
 
1

Drylands Management, Eco Construction

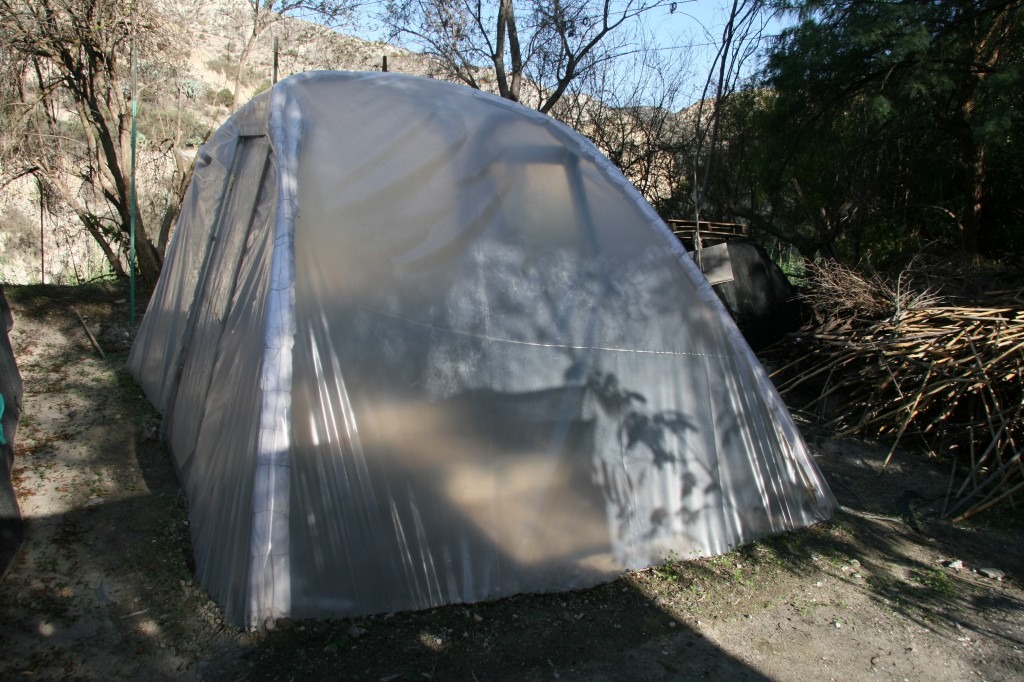
We have finally built the greenhouse for the seedlings from our nursery so they can spend the winter calentitas!

We are in a desert climate zone, so that the amplitude of temperature between day and night is quite large, and not only that, but the night temperature tends to be very low, causing frost. This situation is more pronounced in the botanical garden, as it is in a lower part of the valley, seriously affecting seedlings from the nursery.

In the nursery we germinated seeds that were collected during the past year for revegetation and regeneration of the area, and used as resources, such as carob. The seedlings that will be moved to the greenhouse are: albaida and albaidilla, genista, retama, black hawthorn and carob tree. Carob is the plant most affected by frost. The temperatures below 5 ° C can cause tree death, by the interruption of the flow of sap. Due to these reasons, we have built the greenhouse in the botanical garden, next to the nursery, in a sunny spot.

First, we have taken measurements of a similar structure from one of the gardens and adapted them to the space we have in the botanical garden. We dug a hole in each corner where the arches were placed and filled with gravel to support the structure, which once placed were covered with plaster and soil. The structure has been made with reed ​​(peeled and cleaned) using a very simple technique: two bunches of about seven reeds are joined together to make the main arches, adding reinforcements in the area of attachment. These are carefully placed with the ends in each opposite hole (not across!) clutching the arcs to maintain the position. Two other arcs are placed to and from the bases of the main arches, across this time.

Once the structure is in place, the doors are installed in the center of the main arches and attached to the ground like the arches are held.
Next, a trench is dug around the perimeter of the structure and the plastic cover is placed. This is tensed and is buried in the trench. Finally, the gates are placed and plants, etc are moved in to the inside of the greenhouse, and enjoy!

Greenhouse inside
Greenhouse inside
Greenhouse outside
Greenhouse outside

Finalmente hemos construido el invernadero para que las plantas de nuestro vivero pasen el invierno calentitas!

Nos encontramos en una zona de clima desértico, por lo que la amplitud de temperatura entre el día y la noche es bastante grande, y no solo eso, sino que la temperatura nocturna tiende a ser muy baja, provocando heladas. Esta situación se ve más acusada en el jardín botánico, ya que se encuentra en la parte baja del valle, afectando gravemente a las plántulas del vivero.

En el vivero hemos germinado las semillas que fueron recogidas durante el año pasado para revegetación y regeneración de la zona, y aprovechamiento de recursos, como es el caso del algarrobo. Las plántulas que moveremos al invernadero son: albaida y albaidilla, genista, retama, espino negro y algarrobo. El algarrobo es la planta que más se ve afectada por las heladas. Las temperaturas inferiores a 5º C pueden originar la muerte del árbol, por la paralización de la circulación de la savia. Por ello, el invernadero lo hemos construido en el jardín botánico, donde llega el sol todo el día y cerca del vivero.

Primero se tomaron medidas de una estructura similar de uno de los huertos y se adaptaron al espacio que tenemos en el jardín botánico. Se cavó un agujero en cada esquina donde se colocaron los arcos y se rellenaron con grava para apoyo de la estructura, y una vez colocada se cubrió con yeso y tierra. La estructura la hemos hecho de caña (pelada y limpia) usando una técnica muy sencilla: se unen ramos de unas siete cañas entre sí para hacer los arcos principales, añadiendo refuerzos en la zona de unión. Estos se colocan cuidadosamente con las puntas en cada agujero que tienen enfrente sujetándose los arcos para que mantengan la posición. Otros dos arcos deben de ser colocados desde y hasta las bases de los principales en forma de cruz.

Una vez la estructura esté colocada, se instalan las puertas en el centro de los arcos principales y se sujetan al suelo igual que los arcos.

A continuación, se cava una zanja en el perímetro de la estructura y se coloca el plástico que la cubrirá. Este se tensa y se entierra en la zanja. Por último, se colocan las puertas y se trasladan las plantas, etc, a su interior, y a disfrutar!

Invernadero por dentro
Invernadero por fuera
0

Appropriate Technology, Eco Construction, Sustainable Living, Tutorial

DSCF0503The African Fridge

By Andreia Bastos

Looking for a homemade way of cooling the drinks, we found out how to make an African Fridge.

The African fridge is mostly used to keep the low temperature of the vegetables, and it works very well with drinks also.

Luckily, we didn’t need to make one, Sunseed already has an African Fridge, lonely, waiting for us to fix it!

Make your own!

All you need is:

Two ceramic pots

Fine sand

Water

Wet towel or cotton fabric

DSCF0508Mirko filling the gap between the pots with sand

The ceramic pots must fit inside one another. Make sure the pots are not glazed or painted, otherwise they won’t work.

Usually the ceramic pots have a small hole in the bottom, if it does they need to be plugged.

DSCF0509DSCF0516

Put the smaller pot inside the bigger one, fill the space between the inner and outer pots with fine sand and soak it with water.

Then put the vegetables inside, cover the fridge with the wet fabric and leave it in a sunny spot.

Yes! The temperature inside goes down as the water evaporates.

DSCF0517Voila!

DSCF0503

Nevera Africana

Por Andreia Bastos

Buscando una forma artesanal de enfriar las bebidas, aprendimos como hacer una Nevera Africana.

La Nevera Africana es mas utilizada para matener la temperatura de los vegetales y tambien funciona muy bien con bebidas.

Por suerte no tuvimos que hacer una, Sunseed tenia una Nevera Africana, esperando a que la arreglasemos!

Hazlo tu tambien!

Todo lo que necessitas es:

Dos jarrones de ceramica

Arena del Rio

Agua

Una toalla o tela de algodon mojada.

DSCF0508

Los jarrones de ceramica deben encajar una dentro de la otra. Asegura te de que los jarrones no estan pintadas o esmaltadas.

Por lo general los jarrones de ceramica tienen un pequeno agujero en la parte inferior, asegurate de taparlo si alguno de los tuyos lo tiene.

DSCF0509DSCF0516

Pon el jarron mas pequeno dentro del grande y llena el hueco entre los jarrones con arena y agua.

Y ya esta! Ahora, pon las verduras/bebidas dentro, cubrelo con la toalla o tela mojada y dejala en un lugar soleado. Lo que ocurre es que la temperatura dentro de la Nevera baja encuanto el agua se evapora.

DSCF0517

0

Eco Construction
Hi, after a while thinking about a fast, cheaper and nice solution for the old stair rail, today we finally have installed the new one, with the help of Joanne who has also cleaned and oiled the pita slice. DSC_0316DSC_0334

Hola, después de un tiempo pensando en una solución buena y barata para el viejo pasamanos de la escalera, hoy hemos instalado por fín el nuevo, con la ayuda de Joanne que también ha limpiado y barnizado con aceite la rama de pita.

DSC_0316DSC_0334

0