Your address will show here +12 34 56 78
Sustainable Living, Tutorial

Part of our mission to live sustainably involves working with the natural abundance that’s at our fingertips to create products that are better for us and our environment. Our Sustainable Living department has been using the beautiful calendula in the Sunseed gardens to make a soothing and hydrating natural moisturiser – and you can make your own with just a few products following the steps below.

Jar of natural moisturiser with calendula flowers

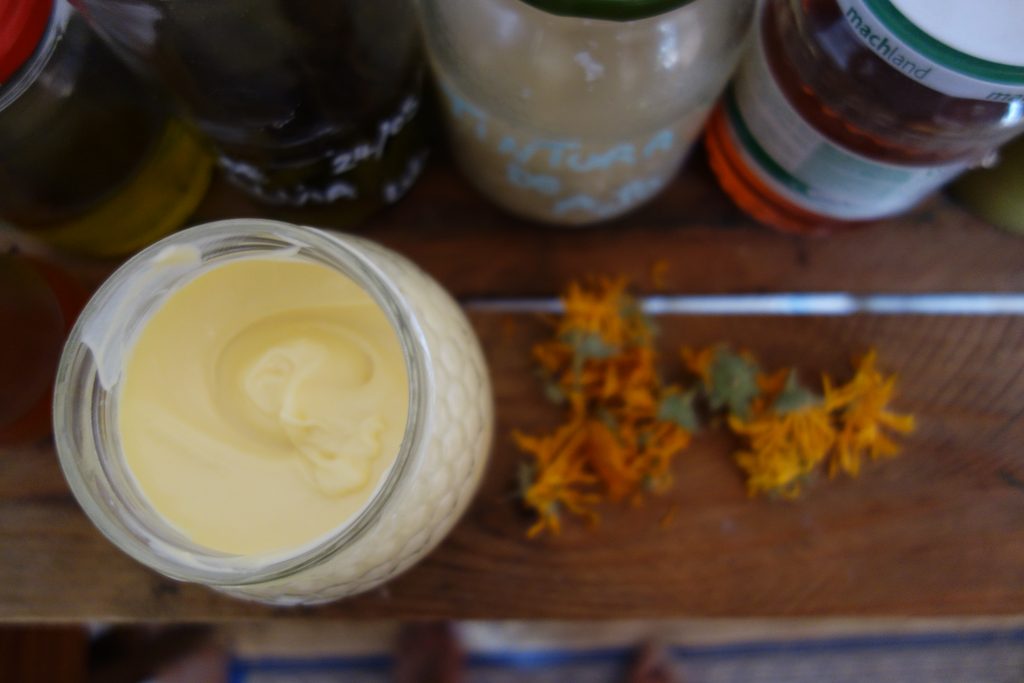
Natural Cosmetics – Hydrating Cream (Calendula Base)

To make a cream, you need three main constituents, Oil, Water and an Emulsifier. Once you combine these three in the right quantities and conditions, they form a soft, velvety and hydrating cream.

You can change the thickness and moisture levels of the cream by altering the ratio of oil to water (thicker creams, like a balm, will have much higher emulsifier levels, especially if using beeswax.)

So prepare your ingredients for 100g of cream:

Oil Part (24g in total)

(12g) Almond Oil infused* (see below) with Calendula

(8g) Olive Oil (mild quality, not too strong)

(4g) Emulsifier (i.e Local beeswax or any store bought veg protein, i.e Lanette or Emulsifan)

Water Part (76g in total)

Distilled (or non-chlorinated) water. You can make this a herbal infusion to strengthen the cream, for example with a handful of rose petals, calendula, chamomile, rosemary etc. Be wary that if you add plants to the water part, it will not preserve anywhere near as long.

Preservative Part = Vitamin E (in oil form) or Vitamin C (dehydrated powdered form). If using Beeswax, this acts as a preservative, as it is a natural anti-fungicide.

Essential Oils: (5-10 drops) Any that you feel suit your cream, medicinal purpose, or personal taste. I often use Lavender, given its clean, fresh aroma and anti-bacterial properties.

Natural moisturiser with calendula

Method:

  • Make an infusion for the water part, leave for 4-12 hours to combine. Preferably water is around 60C-80C, not boiling.
  • Mix together all the ingredients for the oil part in a non-metallic bowl (almond, olive oil and emulsifier).
  • In separate pans, heat both the oil and water parts to 60C-65C, once they reach this temperature immediately remove from the heat. (NOTE: I often find using a water-bath technique to slowly heat the mixtures a safer approach).
  • Now they have been removed from the heat, use a blender to whisk the water part. While its whisking, slowly add the heated oil mixture into the water mix.
  • Once evenly mixed, it will form a runny creamy consistency – allow it cool slightly, and then add in your essential oils and Vitamin E/C.
  • While still hot, pour the mixture into your cleaned/sterilised jars (when warm is it much easier to pour).
  • The cream is ready to use once cool and set, which means it will have thickened.
Making natural moisturisers in our herbarium

*Personally, I like to infuse the oils I use with a particular plant, so in this case I chose Calendula for its emollient (skin softening) properties and that it helps sooth burns and mild abrasions/cuts.

*To infuse the oil with a plant, put a handful of the dried herb into a glass jar, fill to the rim with oil and leave for 30-40 days in the sun, turning/softly shake each day. Or for a quicker, but less effective approach, heat the plant (dried or fresh, just use double the amount if fresh) in a saucepan with the chosen oil, bringing it to around 60-65C. Once reached, take of the stove and leave the saucepan covered overnight to infuse. The oil is ready to use the next day (once you’ve filtered the piece of plant out).

Enjoy!

Feel free to get in touch for more information or clarification. To buy the more technical ingredients i.e Lanette, Vitamin E or C and Essential Oils;  I use this website: http://www.cremas-caseras.es/ as we are based in Spain; however there are a number of ecological organisations around to source this from over Europe.

Luke – sustainable.living@sunseed.org.uk

Want to learn more about how to create natural cosmetics? Join us as a volunteer in the Sustainable Living department!

2

Organic Gardening, Tutorial
soil-918006_960_720

At Sunseed I realized how many resources are wasted everyday when you just throw your kitchen waste away.

When I came here, I did not know anything about compost or how you can fertilize the soil you want to use for planting.

I was very impressed by the ‘compost lasagne’ system we have in Sunseed. It makes our gardens much more sustainable, because we have everything we need for the process. In addition, we can control what we put in our soil and incidentally it saves us money because we do not have to buy manure.

josu

The concept we have is very easy:
The lasagne consists of several boxes. In each is compost in different stages.

We take care of our compost every Wednesday. First we turn the old layers around with pitchforks, so that the compost gets enough oxygen. Than we put a thin layer of paper and cardboard above. Afterwards we add our kitchen waste, put a small amount of earth on the top and water it. All these layers are important to get the right balance of nutrition in our compost. To keep the humidity even when it is very hot, we cover everything with dried material which works perfectly.

At Sunseed we need a lot of manure and therefore we need a fast decomposition process. When you want to try to produce your own compost at home, you just need to move your deposited kitchen waste sometimes and after about a year you have perfect compost. You cannot do anything wrong with the process, it might just take more time.

Our Garden Coordinator Josu explained how you can find out if the compost is ready. You can use it when it holds in shape after you have squeezed it but crumbles again when you move it in your hands.

I love to see how the circle closes, while parts of our food which cannot be used in the kitchen turn back into very fertile soil again.

almonds

Learn more

During my research I found an amazing project in Jordan describing their way of composting.

If you want to prepare compost in a small garden, you can have a look at this website.

And if you live in a flat without garden, you don’t have to go without compost. Ways for composting inside are shown here and here.

Happy composting!

0

Sunseed News, Sustainable Living, Tutorial

In an semi-epic personal journey of finding the simplest most intuitive naturally leavened bread possible, I have finally triumphed. Let the doves free! Cue an orchestra of angels!

OK, so how did I do it? With a little help from my friends! Follow the simple recipe below with distilled wisdom… and you’ll wonder why there could ever be mystery around such an easy thing.

INGREDIENTS

  • Starter*
  • Flour
  • Warm water
  • Salt

METHOD

  • Add a cup or two of flour and warm water to your starter until it’s like thick paint. Leave overnight in a cold place.
  • Add flour (the amount you need) and salt (to taste), warm-hand hot water until you get a lovely, slightly tacky (but not sticky) dough.
  • Knead well for 5-10 minutes
  • Leave for 3-4 hours in a warm place in an oiled bowl
  • Punch down and knead well for 5-10 minutes
  • Shape into loaves. Take out a golf ball amount of dough – this is your new Starter!
  • Allow to rise for 1-2 hours- Bake at 230 for 15 minutes, then reduce to 190/200 for another 20-25 (depending on loaf size)
  • Remove from oven and allow to cool on a rack
  • Bon appétit!  

If you have any questions about how to start a starter, email Sustainable Living and we will tell you how easy it is!  

0

Drylands Management, Tutorial

After a series of interventions in Arizona’s land, we have done the ultimate one!

In the two gullies in the plot, we have built reed and woody barriers to stop soil erosion. The barriers have been interconnected through reed biorolls which were placed using the Key Line technique, addressing the water from the gullies to the slopes to make it more accessible for the plants in them at the same time that erosion is reduce too. Plants have been planted behind the barriers and along the biorolls adding compost as nutrient resource and cactus as water resource. The holes were filled up with water before planting and all has been covered with mulch.

Compost and cactus mixed

It is interesting to know that those plants that had been for too long in a pot need regular watering and in order to face that the following was done:

Bottles of five liters had a hole made in the bottom with a hot metal stick. This hole shouldn’t be bigger than the thickness of the rope that is going to be put in and laid around the bottom of the plant hole. Once the rope is properly glued to the bottle, it’s filled up with water and and placed in the plant hole. By leaving the lid half opened the water will be driven out of the water bottle to the soil along the rope when it is dry keeping a balance of dampness between the two environments, basically an osmosis process.

Water bottles
Water bottles
Water bottle in place

Below the gullies there is a flat area where some work has taken place too.

Trenches were dug taking into account the entrance of water from the gullies (as ripples created by a rock thrown into a pond) and with the same technique applied to the bio-rolls pursuing similar effect. The arriving water filters through and gets absorbed by vegetation planted in the terraces built along them. Along the terraces a mound like pile of earth was created as protection for the planting.

The area between and in the terraces was covered with mulching as in the gullies.

Flat area
Flat area

The plants used for this last intervention were mastic (Pistacia lentiscus), retama (Retama sphaerocarpa), olive trees (Olea europaea), rosemary (Rosmarinus officinalis), efedra (Ephedra fragilis) and carob trees (Ceratonia siliqua).

Plants used

Lastly, another project was carried out in Alan’s land, a nearby Sunseed’s plot:

Retama is a plant that has a symbiosis relationship with a mycorrhiza found in the soil. Six plants have been planted near an adult retama, and another six far from retama and any other plant. The growth is going to be monitor to see the development of both groups.

Retama project with adult retama a)
Retama project with adult retama b)
Retama project without adult retama a)
Retama project without adult retama b)

Después de una serie de interven­ciones en la parcela de Arizona ya hemos terminado la última!

En las dos cárcavas de la parcela hemos construido barreras de caña y ramas de granado e higuera para parar la erosión del suelo. Las barreras están interconectadas con biorrollos de caña que fueron colocados según la técnica de la Línea Clave, redirigiendo el agua de las cárcavas hacia las laderas haciendo que ésta sea más accesible para las plantas en esa área y reduciendo así la erosión en las cárcavas al mismo tiempo. Se han plantado plantas detrás de las barreras y a lo largo de los biorrollos añadiendo compostaje como fuente de nutrientes y chumba como fuente de agua. Los agujeros preparados para plantar se rellenaron de agua antes de poner la planta y todo se cubrió con acolchado.

Cárcavas
Cárcavas
Mezcla de compost y chumba

Es interesante saber que aquellas plantas que habían estado por mucho tiempo en una maceta necesitan que sean regadas regularmente y para arreglar esa situación se hizo lo siguiente:

Se agujerearon por el fondo botellas de agua de cinco litros con una barra de metal caliente. El agujero no debe de ser más ancho que la cuerda que se va a colocar desde ese punto y el suelo en el agujero alrededor de la planta. Una vez que la cuerda se pega correctamente a la botella, ésta se llena con agua y se coloca en el agujero de la planta. Dejando la tapa de la botella medio abierta, el agua se trasladará de la botella al medio externo cuando éste se seque para mantener un balance de agua entre los dos medios, básicamente se trata de un proceso de ósmosis.

Botellas de agua
Botellas de agua
Botella de agua colocada junto a la planta

A los pies de las cárcavas hay un área llana donde también se ha estado trabajando. Se cavaron zanjas teniendo en cuenta la entrada de agua desde las cárcavas (como olas creadas por una piedra que se tira a un estanque) y con el mismo gradiente impuesto a los biorrollos, buscando el mismo efecto. El agua se filtraría en las zanjas y sería absorbida por las plantas que se han plantado en las terrazas. A lo largo de las terrazas se trazó una línea como un montículo de arena como protección para las plantas.

El área entre y en las terrazas se cubrió con acolchado igual que en las cárcavas.

Área llana
Área llana

Las especies utilizadas en esta intervención han sido el lentisco (Pistacia lentiscus), retama (Retama sphaerocarpa), olivos (Olea europaea), el romero (Rosmarinus officinalis), efedra (Ephedra fragilis) y algarrobos (Ceratonia siliqua),

Plantas usadas
Plantas usadas

Por último, a la misma vez que este proyecto, otro se llevó a cabo en la parcela de Alan, cerca de Arizona:

La retama es una planta que establece una simbiosis con la micorriza que se encuentra en el suelo. Seis retamas se plantaron cerca de una retama adulta y otras seis se plantaron lejos de retamas y cualquier otra planta. El crecimiento de estos dos grupos va a ser monitoreado para ver el desarrollo de los mismos.

Proyecto de la retama con una retama adulta a)
Proyecto de la retama con una retama adulta b)
Proyecto de la retama sin retama adulta a)
Proyecto de la retama sin retama adulta b)
0

Drylands Management, Research, Tutorial

As the growing conditions around Sunseed are very harsh with very little rain and soil depleted from nutrients, it is very important to use innovative methods to protect plants from the harshest sun in the summer and frost in the winter.

At the moment in the Arboretum, the application of mulch (mostly reeds) is tested to see its benefits for growth along with a new, water saving design for planting. Mulch is basically any layer spread to cover the soil, be it biomass, mineral mulch, such as stones or gravel. Our mulch of choice is reed due to availability, enhanced with some weeds as we pull them out. The most important benefit of mulching in an arid area, such as Los Molinos, is that it reduces the evaporation of water from the ground keeping the soil moist longer. It works also as protection against wind, winter frost and scorching heat of the summer. An additional benefit in organic mulch is that it will eventually decompose adding good quality, nutrient rich soil to the barren desert and while still in place, it will attract insects to add to the biodiversity. Some of the insects can even be beneficial to the plant as they can be predators of some more harmful insects.

3 REDUCEIllustration : Picture of one part of the Arboretum, covered in reed mulch

On the negative side for organic mulch, it will need replacing from time to time as it decomposes. It should also be noted that decomposition of the mulch requires nitrogen, which is available in fresh plant material, fertile soils and in fertilizers, so it is important to try and see to it that there is enough nitrogen available for the decomposition to not compromise the nitrogen available for the plant to grow.

We applied to some plants in the Arboretum a simple design for improving the irrigation system. The design include a trench around the tree filled with stones in terms to act as a water channel to irrigate the tree. In addition, we cover it with biomass and thorny branches to take extra protection agains wildbores.

other mulchDesign and methodology. a. Dig a trench around the plant (above and profile views). b. Put some thorny branches along the trench. c. Place some stones. d. Plant the plants e. Addition of mulch on the top.

2 REDUCE

Illustration : Tabacco with trench and mulch, surrounded by Aloe Vera which does not need mulch

In addition, a research was carried out to find out which plants benefit from mulch and what type and amount should be applied.

Table : water requirements and mulch recommendations for the plants in the Arboretum

Plants Water requirements Mulch need Comments
Lavender Dry conditions No
Rosemary Dry conditions Organic mulch for infertile soil No mulch but rock or gravel in normal conditions fungus diseases if overwatering
Lemon grass Hot and humid conditions A thick layer to keep the humidity and to protect from frost in the winter
Aloe vera Dry conditions Only mulch to avoid frost Moisture retention to be avoided, so no fresh organic material
Yarrow Dry to medium conditions 5 cm of organic mulch to avoid weeds Avoid overwatering for root rot and mildew
Lemon verbena humid conditions A thick layer to keep the humidity and to protect from frost in the winter
Calendula Full or partial sun and watering moderately Mulches help (weeds, pests, water evaporation…)
European fan palm Sunny and warm but tolerate cool temperature (until 7C) Mulches help keep shallow palm roots from drying out quickly Do not keep wet all the time
Pomegranate semi-arid mild-temperate to subtropical climate Mulch during spring and summer Water thoroughly twice a week on light soils and once a week on clay soils
Myoporum Dry climates Mulches help. Note : not directly base of the plant, let a sapce (4 to 6 inch layer)
Mediterranean buckthorn Normal to moist Mulch for connserving moisture
Cassie flower Dry/desertic climate leaf or bark mulch
Wattel Hot/dry climate Mulches help
Almond sub-tropical dry warm climate Mulches help. pine trees or alpha-grass Does not like exceed of humidity
kidney vetch dry grasslands and rocky environments with calcareous soil
Ruscus aculeatus – Rusco Dry and moist locations Mulches are used
Maguey – Agave americana Drought tolerant Gravel or rocks Well drained conditions. Avoid watering your agave in fall to help it toughen up for winter.
Kermes oak Dry, sunny slopes A mulch of the leaves repels slugs, grubs etc, though fresh leaves should not be used as these can inhibit plant growth
Sweet orange Moderate moisture 5-10cm of mulch, spread on at least a little bit larger area than the canopy. Leave 30cm area clear of mulch around the trunk to avoid rot and vermin Pine mulch would be ideal as orange prefers slightly acidic soil and it also passes water and air easily to the ground
African tamarisk Adapted to all conditions A thick layer of mulch is preferred as the leaves contain salt, which will increase the salinity of the soil when they fall
Common fig Moist conditions, weekly watering Thick layer of mulch to keep in the moisture Yellowing or dropping of leaves or fruit is a sign of drought stress
Hazel Can tolerate drought but needs watering Thick layer of mulch for moisture retention Don’t let mulch touch the stem or trunk of hazel as it may cause it to rot
Black hawthorn Moist soil, low tolerance to drought Thick layer of mulch for moisture retention and frost protection
Loquat Good drainage, doesn’t tolerate flooding. Otherwise adaptable 10-15cm of mulch Keep the trunk area clear of mulch for air to circulate to avoid rot
Peruvian pepper No soaking or flooding, otherwise adaptable to many moisture levels Any kind of mulch can be added
Opuntia Dry conditions, good drainage No mulch, or a little bit of dry mulch for weed control
Siberian elm Prefers moist soil but tolerates drought as well. No flooding Thick layer of mulch for moisture retention
Velvet mezquite Tolerates dry conditions well At least 3 meters in diameter of mulch for young plants. Older plants will benefit from moisture retention as well
Holly oak Tolerates dry conditions but thrives when some moisture is present 5-10cm of mulch. Only dry mulch around the root crown if any and no watering around root crown Dry mulch helps repel slugs and grubs while moist mulch may cause root disease
marjoram Draught tolerant but likes moisture. Doesn’t tolerate frosts. Mulch is beneficial but it is good to let it dry out between watering Cut back watering during the cool months and add more mulch for frost protection
Aleppo pine Good drainage, weekly watering in the summer, less in the winter 5-8cm of coarse organic mulch leaving the root crown bare to avoid disease Doesn’t tolerate flooding or extreme temperatures
Carob tree Fertile soils Wood chip mulch is the best, likes the provided nutrients from decomposing mulch
Olive tree Moist conditions 10-15cm of mulch. Straw is the best Leave the base of the tree bare Likes the added nutrients from decomposing mulch. Also benefits from moisture retention and cooling of the soil
Cork oak Mediterranean climate mulch the tree, keeping the mulch away from the trunk Not use fertilizer, decaying mulch is enough

Teniendo en cuenta que las condiciones en climas semiáridos son difíciles, es importante usar las mejores maneras posibles para maximizar los recursos hídricos y proteger las plantas de extremas temperaturas.

En el Arboretum, tratamos de ver el efecto del acolchado para maximizar el uso del agua. El Acolchado es, básicamente, una capa protectora del suelo. Puede ser tanto biomasa, acolchado mineral como piedras. El exceso de restos de caña proveniente de las limpieza de la acequia es la utilizarla como acolchado. El mayor beneficio del acolchado es que reduce la evaporación del agua y mantener húmedo el suelo. También protege de vientos fuertes, heladas y el calor más ardiente de verano. Además, acolchados orgánicos tienen beneficios adicionales. Como van descomponiéndose con tiempo, van añadiendo suelo de buena calidad, rico en nutrientes. A su vez proveen de hábitat para insectos y reptiles.

3 REDUCEFoto : Jardín Botánico cubierto de acolchado


En un jardín, un acolchado además de los beneficios ya mencionados, no deja que las malas hierbas crezcan. Pero por contra, también hay que tener en cuenta que la descomposición del mismo acolchado requiere nitrógeno del mismo suelo para permitir actividad bacteriana en el proceso de descomposición.

Aparte del acolchado, a los frutales y plantas medicinales les hemos labrado la tierra y cavado una zanja donde regar. La zanja se rellena de piedras y el resto con biomasa. Como protección contra jabalís se han añadido ramas con espinas (ver diseño).

other mulchDiseño y metodología. a. Cavar una zanja alrededor de la planta (planta y vista de perfil). b. Colocar ramas con espinas. c. Poner piedras a lo largo de la zanja. d. Plantar las plantas e. Cubrir con acolchado.

2 REDUCEFoto: Tabaco con zanja y acolchado, rodeado de aloe vera, el cual no necesita de acolchado

Diferentes tipos de plantas requieren diferente condiciones de humedad. Por tanto los acolchados pueden ser más convenientes en un tipo de planta u otro (ver tabla).

Tabla: Condiciones ambientales y recomendaciones de acolchado para las plantas en el Jardín Botánico

Plantas

Condiciones ambientales

Acolchado

Comentario

Lavanda

Ambiente seco

No

Romero

Ambiente seco

Acolchado orgánico en suelos yermos

Roca o grava en condiciones normales

Enfermedades fúngicas si se riega demasiado

Limoncillo / Hierba de limón

Ambiente de calor y humedad

Una capa gruesa para mantener la humedad y proteger de las heladas en el invierno

Aloe vera

Ambiente seco

Solo para evitar las heladas

Para evitar la retención de humedad no usar materia orgánica fresca, verde

Milenrama

Ambiente entre seco y poco húmedo

5 cm de acolchado orgánico para evitar malas hierbas

Evitar el exceso de agua por posible deterioro de la raíz y moho

Hierba Luisa

Ambiente húmedo

Una capa gruesa para mantener la humedad y proteger de las heladas

Caléndula

Luz solar total o parcial y riego moderado

Acolchado ayuda contra las malas hierbas, pestes, evaporación del agua, etc.

Palmito europeo

Sol y calor, pero tolera temperaturas bajas de hasta 7C

El acolchado evita que las raíces superficiales se sequen muy rápido

Evitar que el suelo esté húmedo constantemente

Granado

Clima semiárido con temperaturas suaves y/o subtropical

Durante primavera y verano

Regar dos veces en semana en suelos arenosos y una vez en suelos arcillosos

Siempreverde

Ambiente seco

No directamente sobre la base de la planta, dejar un espacio de 6 a 8 cm

Aladierno

Condiciones entre normal y húmedo

Indicado para conservar la humedad

Acacia espinosa

Clima seco/desértico

Acolchado de corteza y hojas

Acacia pycnantha

Clima seco y de calor

El acolchado ayuda

Almendro

Clima sub-tropical seco y de calor

El acolchado ayuda. De pino y de alfalfa.

Evitar el exceso de humedad

Albaida

Praderas secas y zonas rocosas de suelos calcáreos

Rusco

Zonas tanto húmedas como secas

El acolchado es aconsejable

Maguey – Agave americana

Tolerante a la sequía

Grava y rocas

Suelos o zonas con buen drenaje. Evitar regarlo en otoño para que para que se fortalezca para el invierno

Coscoja

Laderas secas y soleadas

El acolchado de sus hojas repele las babosas, larvas de insectos, etc, pero no usar las hojas verdes ya que pueden limitar el crecimiento de la planta

Naranjo

Humedad moderada

5-10cm de acolchado repartido sobre una superficie un poco mayor que el follaje del árbol. Dejar un área de 30 cm sin acolchar alrededor del tronco para evitar plagas y deterioro de las raíces

El acolchado de pino sería el ideal ya que este árbol prefiere suelos ácidos y también deja pasar el agua y el aire fácilmente hacia el suelo

Tamarix africana

Se adapta a todas las condiciones

Una capa ancha de acolchado sería lo mejor ya que las hojas contienen sal, incrementando la salinidad del suelo cuando se deshoja

Higuera

Ambiente húmedo, riego semanal

Se recomienda una capa espesa de acolchado para mantener la humedad

Amarillamiento o caída de hojas y frutos es señal de estrés por sequía

Avellano

Puede soportar sequías pero necesita ser regado

Capa gruesa de acolchado para retener la humedad

Evitar que el acolchado toque el tronco ya que lo puede deteriorar

Espino negro

Suelos húmedos con poca tolerancia a la sequía

Colocar una capa gruesa de acolchado para ayudar a la retención de humedad y proteger de las heladas

Nisperero

Suelos con buen drenaje ya que no tolera inundaciones. Adaptable al resto de ambientes

10-15cm de acolchado

Dejar el área alrededor del tronco libre de acolchado para circulación del aire y evitar deterioro del mismo

Pimienta peruana

No empapar o inundar o empapar, pero se adapta al resto de condiciones húmedas

Cualquier acolchado es apropiado

Chumba

Ambiente seco y suelos con buen drenaje

No se aconseja acolchado salvo una capa fina seca para evitar malas hierbas

Olmo siberiano

Preferiblemente suelos húmedos pero tolera secos. No inundar

Capa gruesa de acolchado para retener la humedad

Prosopis velutina

Tolera bien el ambiente seco

Por lo menos, acolchado de unos 3 m de diámetro para las plantas jóvenes. El resto también se beneficiaría por la retención de humedad

Encina

Tolera ambientes secos pero crece muy bien si hay algo de humedad

5-10cm de acolchado, que sea seco y solo sobre las principales raíces si hay y no regar la zona

El acolchado seco ayuda contra larvas y pestes mientras que el acolchado húmedo puede dañar las raíces

Mejorana

Tolera las sequías pero le gusta la humedad. No aguanta las heladas

El acolchado es beneficioso pero sería ideal dejarlo secar entre riegos

Reducir el riego durante los meses más fríos y añadir más acolchado para proteger de las heladas

Pino carrasco

Necesita de suelos con un buen drenaje, riego semanal en el verano y menos en el invierno

5-8cm de acolchado orgánico de grano grueso evitando cubrir las raíces principales por enfermedades

No soporta inundaciones ni temperaturas extremas

Algarrobo

Suelos fértiles

Acolchado con astillas de madera es lo mejor.

Le gusta los nutrientes que provienen de la descomposición del acolchado

Olivo

Ambiente húmedo

10-15cm de acolchado. Paja es lo mejor. Evitar cubrir la base del árbol

Le gusta los nutrientes que provienen de la descomposición del acolchado. También se beneficia de la retención de humedad por el acolchado y enfriamiento del suelo

Alcornoque

Clima mediterráneo

Acolchado pero lejos del tronco

No usar fertilizantes ya que es suficiente con los nutrientes que obtiene de la descomposición del acolchado

0

Sustainable Living, Tutorial
Since March, we have been eating our own olives. We are quite happy of the olive seasoning we did made months ago. In the process of olive preparation we started soaking the olives in a mixture of vinegar, salt and water for about six weeks and changing the water every seven days. The purpose of this is to reduce their bitterness. Once the olives are not too bitter and salty enough, we add the herbs to the tank where we keep them. The different variations of herbs we used include: In the first one, in addition to vinegar, salt and water, we added savory, garlic, thyme and orange peel. 1 reduced The second was seasoned with bay, black pepper, garlic and lemon. 2 reduced clean In the third one we applied a mixture of rosemary, garlic, orange and fennel. 3 reduced And finally, to the last one, oregano, fennel, lemon and cumin were added. 4 reduced and clean

Estamos contentos del aliño de aceitunas que hicimos ya hace unos meses. Llevamos desde Marzo comiendo nuestras propias aceitunas.

El proceso de preparación se llevó a cabo con el lavado de las aceitunas en agua, vinagre y sal durante seis semanas, cambiando el agua una vez por semana hasta eliminar el amargor. Una vez las olivas están al gusto de cada uno (sal y amargor), se le añaden las hierbas que dan el aliño.

Las diferentes variaciones de aliño que hemos probado son las siguientes; En la primera, además de agua, vinagre y sal, hemos añadido ajedrea, tomillo, ajo y piel de naranja.

1 reduced

La segunda variación esta aliñada con laurel, pimienta negra, ajo y limón.

2 reduced clean

En la tercera, hemos aplicado una mezcla de romero, ajo, naranja e hinojo.

3 reduced

Y finalmente, para la última, se ha añadido orégano, ajo, hinojo, limón y comino.

4 reduced and clean

0

Appropriate Technology, Eco Construction, Sustainable Living, Tutorial

DSCF0503The African Fridge

By Andreia Bastos

Looking for a homemade way of cooling the drinks, we found out how to make an African Fridge.

The African fridge is mostly used to keep the low temperature of the vegetables, and it works very well with drinks also.

Luckily, we didn’t need to make one, Sunseed already has an African Fridge, lonely, waiting for us to fix it!

Make your own!

All you need is:

Two ceramic pots

Fine sand

Water

Wet towel or cotton fabric

DSCF0508Mirko filling the gap between the pots with sand

The ceramic pots must fit inside one another. Make sure the pots are not glazed or painted, otherwise they won’t work.

Usually the ceramic pots have a small hole in the bottom, if it does they need to be plugged.

DSCF0509DSCF0516

Put the smaller pot inside the bigger one, fill the space between the inner and outer pots with fine sand and soak it with water.

Then put the vegetables inside, cover the fridge with the wet fabric and leave it in a sunny spot.

Yes! The temperature inside goes down as the water evaporates.

DSCF0517Voila!

DSCF0503

Nevera Africana

Por Andreia Bastos

Buscando una forma artesanal de enfriar las bebidas, aprendimos como hacer una Nevera Africana.

La Nevera Africana es mas utilizada para matener la temperatura de los vegetales y tambien funciona muy bien con bebidas.

Por suerte no tuvimos que hacer una, Sunseed tenia una Nevera Africana, esperando a que la arreglasemos!

Hazlo tu tambien!

Todo lo que necessitas es:

Dos jarrones de ceramica

Arena del Rio

Agua

Una toalla o tela de algodon mojada.

DSCF0508

Los jarrones de ceramica deben encajar una dentro de la otra. Asegura te de que los jarrones no estan pintadas o esmaltadas.

Por lo general los jarrones de ceramica tienen un pequeno agujero en la parte inferior, asegurate de taparlo si alguno de los tuyos lo tiene.

DSCF0509DSCF0516

Pon el jarron mas pequeno dentro del grande y llena el hueco entre los jarrones con arena y agua.

Y ya esta! Ahora, pon las verduras/bebidas dentro, cubrelo con la toalla o tela mojada y dejala en un lugar soleado. Lo que ocurre es que la temperatura dentro de la Nevera baja encuanto el agua se evapora.

DSCF0517

0

by Pako Ibáñez, Appropriate Technology Department at Sunseed It is time to build a biomass gasification cookstove. With this tutorial you can do it in an easy and cheap way. You can adapt the instructions to the materials you have, or you can find or acquire. There is no overly critical parameter. If you make modifications and does not work 100%, adjust and modify to achieve better results experimentally. The tutorial teaches us how to build a biomass gasifier cookstove called Kaña!!!, Version 1.0, and includes:
  • An explanatory text which lists the material necessary to perform it.
  • The needed tools list.
  • Assembly instructions.
  • A video recorded during the biomass gasification course I did in Sunseed which shows all the steps to follow.
  • The instructions for use.
  • A video about the success story of Lucia, who built the Lucificador and got the absolute record of burning time with a powerful flame for 35 minutes using 350 gr. of dry cane.
  • A section with miscellaneous information.
por Pako Ibáñez, coordinador del Departamento de Tecnología Apropiada de Sunseed. Ha llegado el momento de construirse un hornillo de gasificación de biomasa para cocinar. Con este tutorial podrás hacerlo de una manera fácil y barata. Puedes adaptar las instrucciones al material que dispongas, o bien puedas localizar o adquirir. No hay ningún parámetro excesivamente crítico. Si haces modificaciones y no funciona al 100%, realiza ajustes y modificaciones experimentalmente hasta conseguir mejores resultados. El tutorial nos enseña a construir un hornillo gasificador de biomasa bautizado como Kaña!!!, en su versión 1.0, y comprende
  • Un texto explicativo donde se enumera el material necesario para realizarlo
  • El listado aproximado de herramientas a disponer
  • Instrucciones de montaje.
  • Un vídeo grabado durante el curso de gasificación de biomasa que realicé en Sunseed en el que se muestran todos los pasos a realizar.
  • Las instrucciones de empleo.
  • Un vídeo sobre el caso de éxito de Lucia, que construyó el Lucificador y consiguió el récord absoluto de tiempo de combustión, con una potente llama durante 35 minutos utilizando 350 gr. de caña seca.
  • Un apartado con informaciones varias.
Read MoreContinue Reading
0

http://b.vimeocdn.com/ts/450/563/450563563_200.jpg

This is the first Sunseed Video News!

1) Harvesting carob 2) Drying carob 3) Making powder 4) Baking Cake with Biomass Gasification Stove sunseed.org.uk Cast: sunseedspain Tags: sustainability Vía Vimeo / sunseedspain’s videos http://vimeo.com/75893060

http://b.vimeocdn.com/ts/450/563/450563563_200.jpg

This is the first Sunseed Video News!

1) Harvesting carob
2) Drying carob
3) Making powder
4) Baking Cake with Biomass Gasification Stove

sunseed.org.uk

Cast: sunseedspain

Tags: sustainability

Vía Vimeo / sunseedspain’s videos http://vimeo.com/75893060

0